 One of the problems shooting in broad daylight is having enought dynamic range to capture both the highlights and the shadows in the scene. Unfortunately, our cameras (film or digital) aren’t capable of capturing all that information at once.
Typically, you would decide do you shoot to keep details in the highlight areas, shadow areas, or decide to shoot somewhere inbetween and loose a little at both ends.
Another option is to bracket your shots and combine them into one photograph in the computer or the darkroom.
A third option is to somehow compress the dynamic range of the actual scene by adding light to the shadow areas and darkening the highlight areas so that it falls within the capability of your camera to capture it.
It’s obvious enough that you can add additional light to the dark areas of your scene using strobes, but what isn’t as obvious is how you darken the highlight areas espeically when those areas include the sky or some other object that you wouldn’t easily be able to shade (like a building).
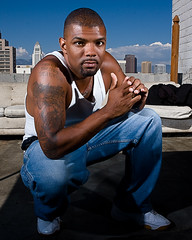
Take a look at this picture of Jason hanging out on a downtown Los Angeles rooftop. He is underneath an awning in full shade to protect him from the sun. The sun was high and behind me a bit to camera right., there would have been no way to have the exposure correct on his skin and have the sky and skyline behind him properly exposed at the same time without doing something drastic.
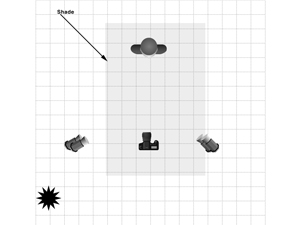
 The key to shooting something like this is to first get your ambient right. I wasn’t shooting with a light meter so I set my camera to its max sync speed (for my Canon 40D that’s 1/250 sec) and then started closing down the aperture until I was happy how the background looked—in this case f/16 at ISO 200 (that’s about 1/3 stop below the sunny 16 rule. I’ll talk about why I shot at ISO 200 in another post). Shooting like this put Jason in full silohette. What I needed to do next was bring in enough light to light Jason to where I needed his exposure to be. Since I was using small flashes (3-sb25 and a 580EXII), I ended up using 4 of them at 1/2 power each about 4′-5′ on set up on either side. This could also have been done with two strobes at full power but I wanted to keep the refresh times relatively low (1 sec between shots vs. 3-5 seconds between shots).
In this case, I had set the ambient exposure first and then started adding lights until I was happy with the strobe lit part of the scene. Other times though, you’ll have your strobes already set and you’ll want to adjust the ambient seperately. How is this done? That’s going to be the topic of part 2.
