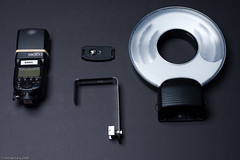
Canon 580EX II, bracket version 1, orbis™ ringflash adapter. © 2008 Michael Kang
If you’re not familiar with the orbis ringflash adapter, take a look at this video. Basically the orbis slips over the head of your flash. It takes the light coming up and into the ringflash redirects it around the ring and shoots it out the front toward your subject. The most common way to use the adapter is point the light to your subject and hold your camera so that you are shooting through the center of the “doughnut.”
When the orbis ringflash adapter was released a big complaint was that you had to hold the flash/ringflash combination with one hand while holding your camera in the other. This meant was you didn’t have a free hand to zoom or focus.
What was needed was a bracket to hold the flash, ringflash adapter and your camera so that you will again have a free hand to operate the various controls of your camera. Orbis has since released their own version of a bracket called the orbis™ arm. It looks very well engineered and the reviews say it does exactly what it is intended to do. Unfortunately, when I purchased my orbis, when it was first released sometime in late 2008, I had no other option than to try and build my own bracket.
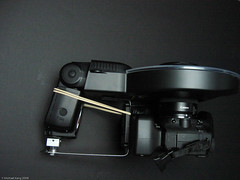
Fully assembled version 1 DIY orbis bracket with Canon 40D and Canon 580EX II. © 2008 Michael Kang
I ended up with two different designs for the bracket. The design goal of version 1 was to be compact. The problem with this was the position of the flash meant that I lost the use of the AF assist light when shooting with an ETTL cable. In version 2 of the design, the flash is attached to the bracket in the same position as it would be held.
The main bracket is made out of a steel strap from a home improvement store. I think its usual purpose is to connect pieces of wood (like 2’x4’s) together.
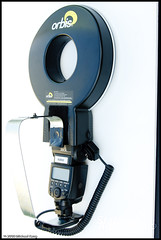
DIY orbis bracket version 2 with Canon 580EX II and ETTL flash cord. © 2009 Michael Kang
I drilled a hole to fit a 1/4″ bolt to hold the flash cord hot shoe. I then shaped the steel strap so that my camera would sit in the proper position when the flash and Orbis adapter are attached. This was a completely trial and error fitting. The reason I bend the strap the way I do (the other designs I’ve seen, as well as the official Orbis bracket has it bent the other way) is so that I can use the bracket as a handle. Once I figure out where the camera needs to be, I drilled another 1/4″ hold to hold the bolt that will attach to the camera’s tripod mount. I used gaffer’s tape to cover and sharp edges to prevent the bracket from accidentally marring any of my equipment. The last (optional) step is to attach some hook and loop tape to a slight bend in the steel that I created to keep the Orbis flush against the bracket. The purpose for this is to keep the Orbis from leaning or putting any pressure on the lens and lens mount. That’s about it. The materials cost about $5 and took about a half-hour to assemble.
If you have any questions, please leave them in the comments.