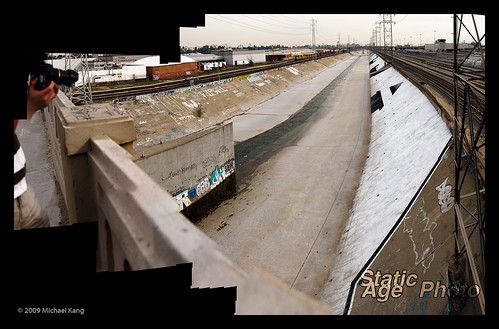
On February 21, I attended a huge event sponsored by the Los Angeles Group admins on flickr. Typically these “flickr-walks” bring out about 10-20 folks. This one had to have had over 100. The official thread for the event is archived here.
For this day I decided to try a technique where you tile list of individual images to give you one large image. This is really handy if you don’t have a wide angle lens and you can’t back up far enough to get the shot that you want. In these examples, I went out with my 50mm f/1.4 which on my Canon 40D gives me something around an equivalent focal length of 80mm on a full frame camera.
Follow the jump for an explanation about how I put these images together.
In a typical panorama you would shoot from left to right (or right to left) to get a wide view of the world.
In a mosaic, you just add frame above and/or below what you would normally capture in a panorama. The more shots you have the better and the greater the amount of overlap you have the better. Usually you would use a tripod for this, but if have Adobe Photoshop CS3 or later, handheld should work fine (all these examples were taken handheld).
You also want to get as many extra images as you can around the edge. Basically, the more information about the scene you can capture, the greater flexibility you will have later on when you stitch everything together.
I will either start from the center and spiral out or start at the top-left corner and proceed, left-to-right, down one, right-to-left, down one, etc. If you’re using Photoshop, the order doesn’t really matter.
Unless you want differences in color and brightness between frames, you will want to make sure that you are in manual including white balance and focus. Also, avoid using a polarizing filter for the same reasons.
There are plenty of tutorials online about how to stitch your photos into a single image (in Photoshop parlance it is called Photomerge). I found a good one at Layers Magazine here.
What I found when doing this is that Photoshop is not always successful putting the photos together. Especially if you have large areas where there is little identifying detail (such as in the sky) or if you have gaps in your image. In this case, what I do is reduce the number of images in the mosaic and let Photoshop work on different parts of the image and then I merge those parts together–either with photomerge or by hand. And that’s about it.
There is another use of this technique that is commonly called the Brenizer effect, popularized by portrait and wedding photographer Ryan Brenizer. He has written about it extensively on his blog here.
With a little care you can also use it on subjects that aren’t completely still. I have an example in a previous post of a mosaic taken at a concert.
You can see a lot more examples of this technique at the Mosaic’d Panoramas group on flickr.
If you’re inspired by any of this, leave a post in the comments with a link to your photo stitch.


